Cart

Finding Your Copier IP Address

FINDING YOUR COPIER’S “IP” ADDRESS

Your copier/MFP/scanner may have a screen that displays the “IP.” Most users have never tried to find it so that can be awkward. There may be a counter (meter) report that includes the IP address, and this is usually easy to access and print if you provide meter readings to your service company.

But, you can also find your copier’s IP right on your PC. To do this you want to open the “Printers Window” or folder, where all the printers and devices you have access to are listed. It may be a chart of icons that look sort of like printers or copiers. When you get there, RIGHT CLICK on the copier/MFP you will be scanning FROM. It may or may not be your default printer – doesn’t matter.

When you right-clicked you got a “pop-up” menu in which the 4th or 5th item down is called “Printer Properties.” If you are looking at Windows 7, or later versions, there may be a second item at the bottom of the menu that says, simply, “Properties.” That one won’t help you; be sure it says Printer Properties. Click on that one with a normal click. (If you are on Windows XP, there is only the “Properties” item at the bottom – click on that for XP.)

As you can see to the right, there is a new “dialog” window that has tabs across the top and one of them (3rd from left) is “PORTS.” Normal-click that tab.

There are probably several “ports,” including “LPT1” and others, plus one or more “IP” ports and “USB” ports. Unfortunately, the list of ports is in a small window, but there is a scroll-bar on the bottom to pan left and right.

There is an up/down scroll bar on the right, as well, IF you have lots of ports. Scroll down until you see the NAME of the machine you want on the right side of the window area. The PORT information is on the left-most segment of this line.

You won’t be able to see it right away because Windows politely covers it up with the left-right scroll bar. Scroll down one more line so that it’s fully visible.

Now, place your mouse curser on the faint gray divider between the “Ports” column and the “Description” column: it will change into a double arrow. “Drag” the line toward “Description” and the “Ports” column will widen to where you can see the whole IP address, OR you may see a string of letters and numbers that comprise the NETWORK NAME of the copier/scanner. If it is an IP address you will see 4 groups of up to 3 numbers each, separated by “dots,” which is to say, periods. Write down the IP or the string of mixed characters (which may actually spell something). It is that set of numbers and dots or the name string that is the identity of the COPIER (port) by which the copier/scanner can communicate to computers on the network, including yours.

Your Friend, Ohhh-Cee-Ahhr

The first document management system (scanning, indexing and retrieval) Copilabs sold was to the original “MVP Sports” headquarters. It cost nearly $50,000 and was readily cost-justified. “How is that possible,” you ask?

They had a filing system comprised of 19 lateral file cabinets, 4 drawers each. There were always bulging folders sitting on top of the cabinets, awaiting re-filing. The opportunities for loss of pages, or simple misplacement of files, was large. The costs of time and loss were larger than the cost of financing the new electronic filing system.

For that system, 22 years ago, one operator had to select and enter indices for the kinds of documents contained in one “file.” It took 4 to 5 hours per day and the system still cost-justified.

How wonderful that the filing and indexing represented by that huge investment can be matched with a fast PC, a good copier / scanner and $400 worth of software. The indexing will now be done automatically thanks to “OCR” or Optical Character Recognition.

OCR is a database (that is itself indexed) of patterns of black and white pixels (“pels,” more correctly) that are matched with known patterns that form letters and numbers that transmit information to humans. We say that OCR “reads” the images we “capture” by scanning, and turns them back into real printing. Most simply, for indexing purposes, OCR need not be perfect, only “close” to complete translation of the black and white areas of our scanned images into whole words or strings of numbers or characters that may be connected to the “page-image” we’d like to look at right now, thank you very much.

At a speed of about one second per page, OCR software can “read” scanned pages and connect “hidden” pages of adequately translated sets of words on those page-images, and those sets of words, even the imperfect translations, are themselves indexed. Those indices tie the words, phrases and number-strings to the specific page – or pages – on which they appear: word – page – document – folder – directory – drive.

You type in the “key words” or number-string and up pops the document or, even, the single page inside that document that you need to see – in seconds. In various forms, OCR-based indexing can be very sophisticated, or relatively simple. In a simple form, your OCR indexing software “watches” directories and folders where scanned images are “saved” as part of the scanning process. When a document is added or augmented, the OCR and indexing database swing into action, reading all the new or changed pages, indexing their “read” characters and words and updating the database for the filing system. As soon as it is done, a user can find one or more of those pages with a pertinent keyword or character string.

Contact us to try OCR on your files.

Thanks!

Making the Scanner Scan

“I put my document on the feeder, but it doesn’t scan…”

Of the four most popular kinds of scan functions, the most common is called “SMB”. SMB stands for “Server Message Block’” and it basically means that you are “pushing” or sending scanned images of pages to a directory, or “folder” on a computer: your desktop PC, your network’s file server, or a computer in a remote location. Whichever it is, that computer must have “issued” a form of “permission” that allows you to send a document into its file system. There are a handful of key conditions that must be met or your copier/scanner will beep at you with an error message.

In the case of most copiers there are good on-board web-pages that allow you to log-in to the copier so that these conditions, or parameters may be “set.” Usually you can log-in to the copier with the copier’s own “IP address.” This page will show you how to locate your copier’s IP address.

In SMB scanning, the computer-destination you are going to scan TO is always referred-to as the “server,” even if it’s your own desktop or laptop.

Well, here you are, then, at the place where you can enter these key parameters that will complete the scanning “circuit” to the folder where you are going to send your scanned images. Here is the “SMB” entry screen for a Kyocera-Copystar scan setup – we love these machines.
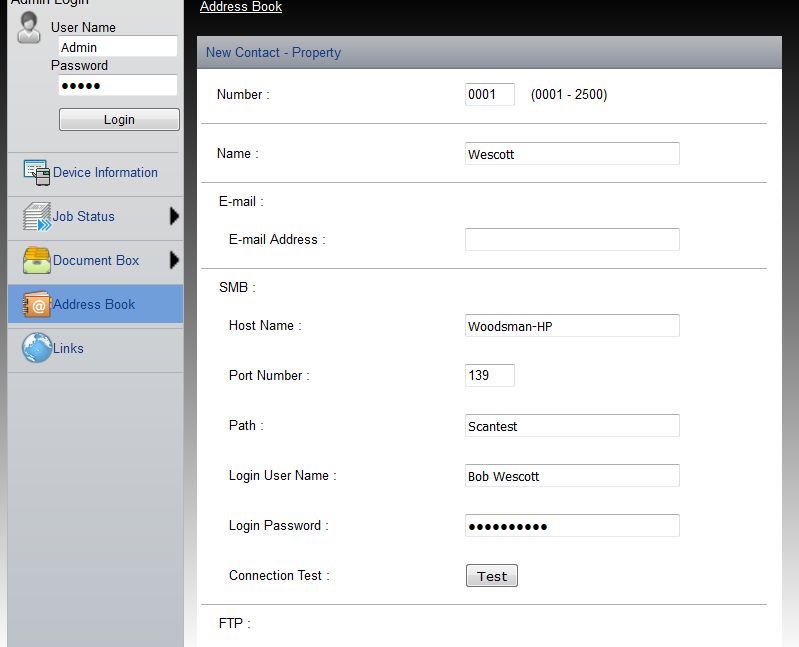
You’ll be entering the following:

  1. User name. This might be your name or it could be a name like “Scanner” or “Sender” if everyone scans to a single folder. It is simply the identity that appears at the copier screen in “Send” or “Scan” or “Store” mode.
  2. “Server” name. If you are scanning to your own PC, it is the “server.” For this you need the NETWORK NAME of your computer – Hint: On your copier “Server” name might be called “Host Name.” If you don’t know it (smart IT people often label PC’s with the exact name), you can find it by clicking here. SOMETIMES you won’t be able to connect with the computer NAME, and you’ll need to use the computer’s IP address. “Oh, no!” you’re worrying. Well don’t worry, just click here. Either way, enter the NAME or the IP ADDRESS in the field for “Server Name” (Host Name).

Then comes a mysterious field (may not be this exact order, but all of these parameters are needed) called “PORT,” or, “Port Number.” Now, however, it’s a 3 or 4-digit number. The default is often “139.” Sometimes we have to use “445” because “139” is used by another program. In theory, there are thousands of possible “port” numbers. You’ll really need “IT” if one of these doesn’t work for you; he, she or they will know if there’s a good reason it doesn’t, and they can provide you with one or more to try. In any case, the port number is a key “permission” to communicate with the PC or server.

Now you must provide a “PATH” to the exact folder or directory where you want your “scan” to wind up. That is, you must have a shared folder on your PC or on the network server, that has been “shared” as part of its set-up. Sometimes there is a “shared” directory or “Drive” on the Server with several sub-folders for multiple users or purposes. If set up by your IT person correctly, every folder created inside that directory “inherits” the “shared” quality and may be used as a location for receiving scanned images.

The “path statement,” however, varies from manufacturer to manufacturer. If you have created a shared folder called “Scans” on your “C:” drive on your own PC, the path statement is simply Scans (on a Kyocera or Copystar). On some makes of copiers it may be necessary to have a “\” back-slash mark in front of Scans, so, “\scans.”
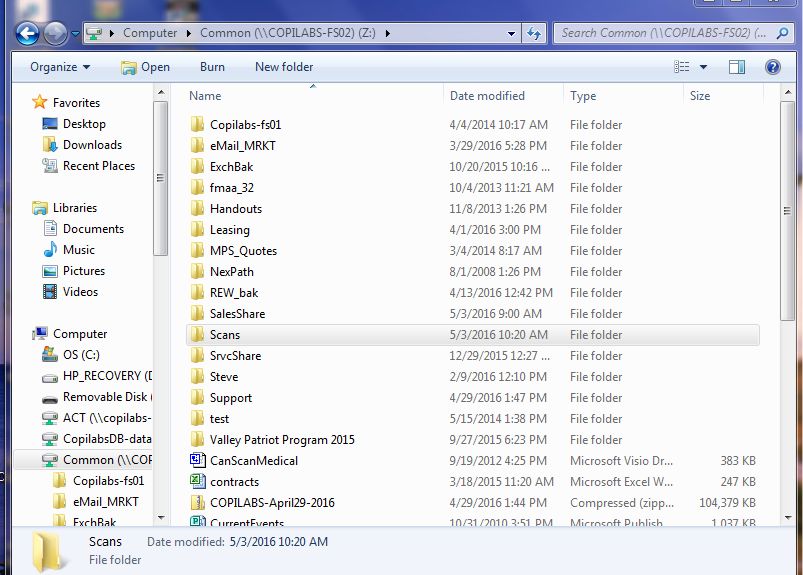
Where it can get complicated, and where you’ll want some assistance, is for folders on the network server or on a remote Server or PC. In the image at right you can see a “directory tree” on a server which is NOT the user’s own PC. The “PATH” statement now has multiple “steps” to the highlighted folder.

First, a NOTE: You can see at the top of the screen that this remote directory is called “Z:” and your remote shared directory may also have a single-letter “name.”

YOU CAN’T USE THIS “DRIVE” LETTER in your “path statement.” That letter is known only on your own PC and the copier/scanner won’t be able to “find” it when it tries to follow a path to the Scans folder. You must use detailed naming of the “steps” to your remote Scans location (folder).

In the example shown in the image, above, the true “path” reads as follows:

common\scans. But this is true only because in the “Server” or “Host” name field we entered the Network Name of the server, “COPILABS-FS02.”

The Server or Host name is part of the “path” to your destination folder for scanned images. In some networks you may have to use “UNC” naming of the “host” computer, in which case it would be \\COPILABS-FS02. In any event, once you are “in” the destination computer, the rest of the path statement is fairly simple.

The most common error message when scanning fails is “destination”. Beeeep.

There are two more critical keys to reaching your destination folder: a Login Name and Password for the computer, itself.

If you are scanning to your own workstation, then it’s the log-in you use every morning, including both user name and password. When your IT policy causes your password to change, your ability to scan will suddenly cease. You must then open up the built-in web-page of the copier/scanner and replace the password with your new one. Don’t worry; no one else can see it.

If you are scanning to the company “server,” you will need “IT” to type in the user name and password to the server – they usually don’t like to share this information.

Would you like some help? Call our service number: 978-794-1413, ext. 202 and say so; leave your machine ID number if leaving a voice-mail. Thanks!

Let Copier-Scanning Pay Off

“My copier is my scanner…”

“Everybody scans documents,” is a fairly safe statement. Almost everybody dreams of “going paperless” because it might save (pick some): The Planet, a Tree, a Whale, a Polar Bear. And any of these is a good thing. It might save mistakes and losses of information – and that’s important, too. It could save a life, keep someone out of jail, or find a missing person – more good things.

How we manage and rely on “scanned documents,” however, is VITAL to the success of the organization, or of the person, or of the DATA itself. The right DATA, at the right TIME, can be quickly converted to INFORMATION that REAL PEOPLE can make decisions with. It could make a sale and preserve a multi-year relationship; it could save people from making mistakes by shipping the wrong product, filing the wrong legal form, or prescribing the wrong medication.

Scanning bridges two ‘worlds’ of information: Paper and Digital. For all of our reliance on computers, we have also learned to be skeptical of what is happening to our information when it is reduced to magnetic bubbles in a black box or, worse, in the “Cloud.”

The explosion in “Security” services, softwares, consultants and devices, and the corresponding inventiveness of hackers and identity and other data thieves (including official “government / military” hackers) should have everyone with a computer or “smart” phone on permanent edge. With billions of transactions taking place every day, from Starbucks and McDonalds to Wall Street and International Banking, we are all both more dependent upon and more nervous about “electronic” data than ever before.

The ease of scanning has encouraged many, if not most of us to convert utterly stable PAPER data storage, into somewhat worrisome DIGITAL data storage. It is worth some planning, consideration and RE-consideration of what we are scanning and how to keep it as safe as paper has been for thousands of years.

FEAR NOT! We can help make scanning work for you and actually serve your most important purposes – even for quite small offices and operations. Here are the big issues:

  1. Volume of pages in paper format that you’d like to access on-screen.
  2. Daily volume of “new” scannings.
  3. Are you ‘archiving’ or creating ‘live,’ rapid-service/customer-service documents?
  4. Is access restricted within your organization?
  5. Are there legal requirements?
  6. Are you scanning for YOUR convenience, or is the Government making you do it?
  7. Do you need to access files from remote locations?
  8. Do you hope to resolve “filing” problems that papers make worse?
  9. Do you already have large numbers of digital files that are becoming hard to find?

These and many other questions are readily addressable. Copilabs has a long and glorious history of keeping copiers and printers CREATING paper documents. Now we work just as hard to help you transform them into electronic documents… without making them a new, costly problem.

Check out our pages on setting up scanning on copiers, and helpful hints for usage.

Finding All Those Pages

We’ve used indexes (also called indices, nowadays) since we’ve had writing. As soon as we made separate rooms for different grains, or put fences between fields, we’ve kept lists of which was which. Chapters in books, page numbering, wooden pigeon-hole sorting cabinets, street addresses: they’re all types of indexes. Even the numbers on sports uniforms are used to link players’ names with their positions on the field, their lockers in the clubhouse, their paychecks and so on. Indexes.

When you start scanning pages and saving them in a computer, the software “names” each page or batches of pages, called documents, by date and time and job number or with a number that “increments” by one number-value higher than the previous page scanned that day or the previous page stored in that folder / directory. By itself that string of information is not particularly helpful for retrieving that image of the words on the page or pages you need to learn from. So, we create two simple computer indexes: document naming conventions, and logical folder / directory names.

If we are looking for Smith, Inc. invoices we would go to the Smith, Inc. folder in our computer filing system. If there are hundreds of pages filed in the Smith, Inc. folder you will be looking for those you named “Invoice” together with a date and invoice number you may have added. Those are the pieces of information you would know when you went looking, aren’t they?

Think of your paper-filled file cabinets that you hope to eliminate with scanned documents (“electronic files”). If you were going to find a Smith, Inc. invoice from February of 2012, you would know which cabinet to look in, which drawer to roll out and then, by those little plastic tabs, which Pendaflex to look inside of. That’s because everything was labeled or named as you filed it for just this purpose. Those bits of knowledge and labeling are all “indices.”

But, part of the value of electronic files is saving time. When you go looking in your computer to get the February, 2012 invoices, only, to display on screen, you want it to happen quickly. You don’t want to, figuratively, walk to the file cabinet, check the labeling of the cabinet and drawers, pull one open, paw through the hanging folders and finally open the manila folder that has invoices in it. No, what you really want – and can obtain from electronic filing – is for Smith, Inc’s “Feb, 2012, Inv” PAGES to appear on screen, or in a simple list on screen from which you can choose, by entering the quoted string, above or clicking on a couple of identifiers in a drop-down list.

Or, even better, maybe you could look at only the ONE invoice you care about at the moment, by typing in the invoice number, which would be unique to that page among the thousands of scanned pages. That will be cool.

And, it’s possible without your naming every single scanned page separately. It’s all thanks to “OCR.”

Read more about OCR.