“I put my document on the feeder, but it doesn’t scan…”
Of the four most popular kinds of scan functions, the most common is called “SMB”. SMB stands for “Server Message Block’” and it basically means that you are “pushing” or sending scanned images of pages to a directory, or “folder” on a computer: your desktop PC, your network’s file server, or a computer in a remote location. Whichever it is, that computer must have “issued” a form of “permission” that allows you to send a document into its file system. There are a handful of key conditions that must be met or your copier/scanner will beep at you with an error message.
In the case of most copiers there are good on-board web-pages that allow you to log-in to the copier so that these conditions, or parameters may be “set.” Usually you can log-in to the copier with the copier’s own “IP address.” This page will show you how to locate your copier’s IP address.
In SMB scanning, the computer-destination you are going to scan TO is always referred-to as the “server,” even if it’s your own desktop or laptop.
Well, here you are, then, at the place where you can enter these key parameters that will complete the scanning “circuit” to the folder where you are going to send your scanned images. Here is the “SMB” entry screen for a Kyocera-Copystar scan setup – we love these machines.
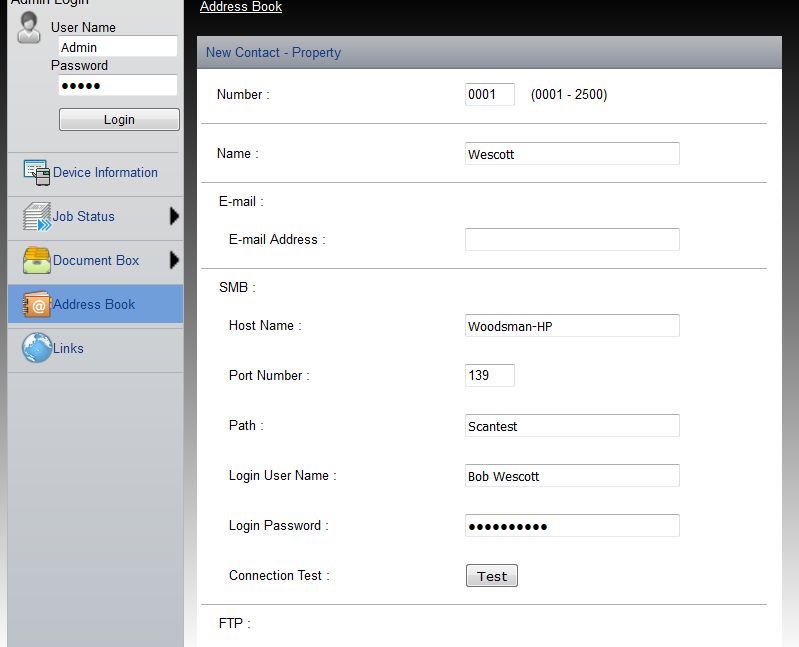
You’ll be entering the following:
- User name. This might be your name or it could be a name like “Scanner” or “Sender” if everyone scans to a single folder. It is simply the identity that appears at the copier screen in “Send” or “Scan” or “Store” mode.
- “Server” name. If you are scanning to your own PC, it is the “server.” For this you need the NETWORK NAME of your computer – Hint: On your copier “Server” name might be called “Host Name.” If you don’t know it (smart IT people often label PC’s with the exact name), you can find it by clicking here. SOMETIMES you won’t be able to connect with the computer NAME, and you’ll need to use the computer’s IP address. “Oh, no!” you’re worrying. Well don’t worry, just click here. Either way, enter the NAME or the IP ADDRESS in the field for “Server Name” (Host Name).
Then comes a mysterious field (may not be this exact order, but all of these parameters are needed) called “PORT,” or, “Port Number.” Now, however, it’s a 3 or 4-digit number. The default is often “139.” Sometimes we have to use “445” because “139” is used by another program. In theory, there are thousands of possible “port” numbers. You’ll really need “IT” if one of these doesn’t work for you; he, she or they will know if there’s a good reason it doesn’t, and they can provide you with one or more to try. In any case, the port number is a key “permission” to communicate with the PC or server.
Now you must provide a “PATH” to the exact folder or directory where you want your “scan” to wind up. That is, you must have a shared folder on your PC or on the network server, that has been “shared” as part of its set-up. Sometimes there is a “shared” directory or “Drive” on the Server with several sub-folders for multiple users or purposes. If set up by your IT person correctly, every folder created inside that directory “inherits” the “shared” quality and may be used as a location for receiving scanned images.
The “path statement,” however, varies from manufacturer to manufacturer. If you have created a shared folder called “Scans” on your “C:” 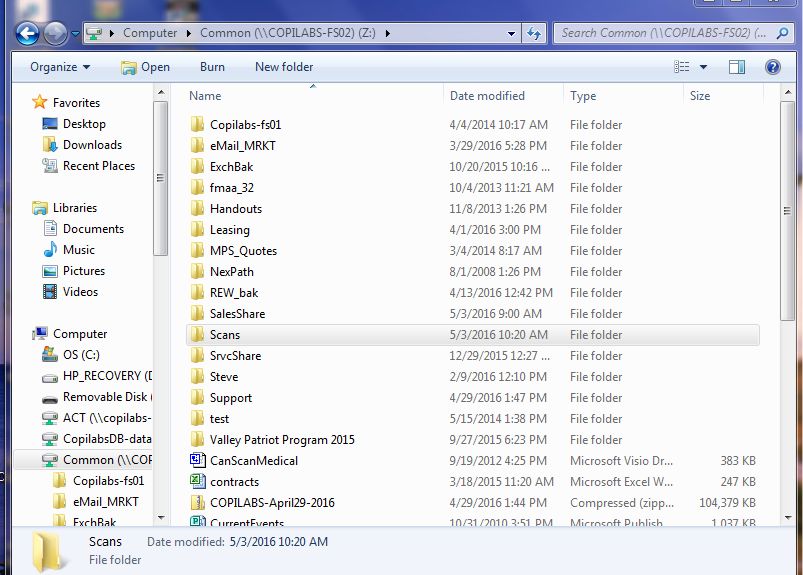 drive on your own PC, the path statement is simply Scans (on a Kyocera or Copystar). On some makes of copiers it may be necessary to have a “\” back-slash mark in front of Scans, so, “\scans.”
Where it can get complicated, and where you’ll want some assistance, is for folders on the network server or on a remote Server or PC. In the image at right you can see a “directory tree” on a server which is NOT the user’s own PC. The “PATH” statement now has multiple “steps” to the highlighted folder.
First, a NOTE: You can see at the top of the screen that this remote directory is called “Z:” and your remote shared directory may also have a single-letter “name.”
YOU CAN’T USE THIS “DRIVE” LETTER in your “path statement.” That letter is known only on your own PC and the copier/scanner won’t be able to “find” it when it tries to follow a path to the Scans folder. You must use detailed naming of the “steps” to your remote Scans location (folder).
In the example shown in the image, above, the true “path” reads as follows:
common\scans. But this is true only because in the “Server” or “Host” name field we entered the Network Name of the server, “COPILABS-FS02.”
The Server or Host name is part of the “path” to your destination folder for scanned images. In some networks you may have to use “UNC” naming of the “host” computer, in which case it would be \\COPILABS-FS02. In any event, once you are “in” the destination computer, the rest of the path statement is fairly simple.
The most common error message when scanning fails is “destination”. Beeeep.
There are two more critical keys to reaching your destination folder: a Login Name and Password for the computer, itself.
If you are scanning to your own workstation, then it’s the log-in you use every morning, including both user name and password. When your IT policy causes your password to change, your ability to scan will suddenly cease. You must then open up the built-in web-page of the copier/scanner and replace the password with your new one. Don’t worry; no one else can see it.
If you are scanning to the company “server,” you will need “IT” to type in the user name and password to the server – they usually don’t like to share this information.
Would you like some help? Call our service number: 978-794-1413, ext. 202 and say so; leave your machine ID number if leaving a voice-mail. Thanks!